Generating and Editing Illustrations
Illustrations are most of what a reader sees. This guide covers both halves of the job: getting a picture onto the page in the first place, and reshaping, cropping, recolouring or redrawing it once it is there.
Three ways to get a picture onto a page
Open the Pictures tool on the left toolbar. From there you can:
- Generate a new image from a description, in your book's art style.
- Upload images — bring in your own artwork or photos.
- Browse the library — ready-made pictures sorted into categories (All, Characters, Nature, Holiday and more), plus a search box at the top.
The panel also keeps three shelves you will come back to constantly: Uploaded, Recently used and Recently generated. Reusing a picture from these costs nothing, which is worth remembering before you generate a second version of something you already have.
Generating an image with Magic AI
Magic AI is available on the Creator and Master Pro plans.
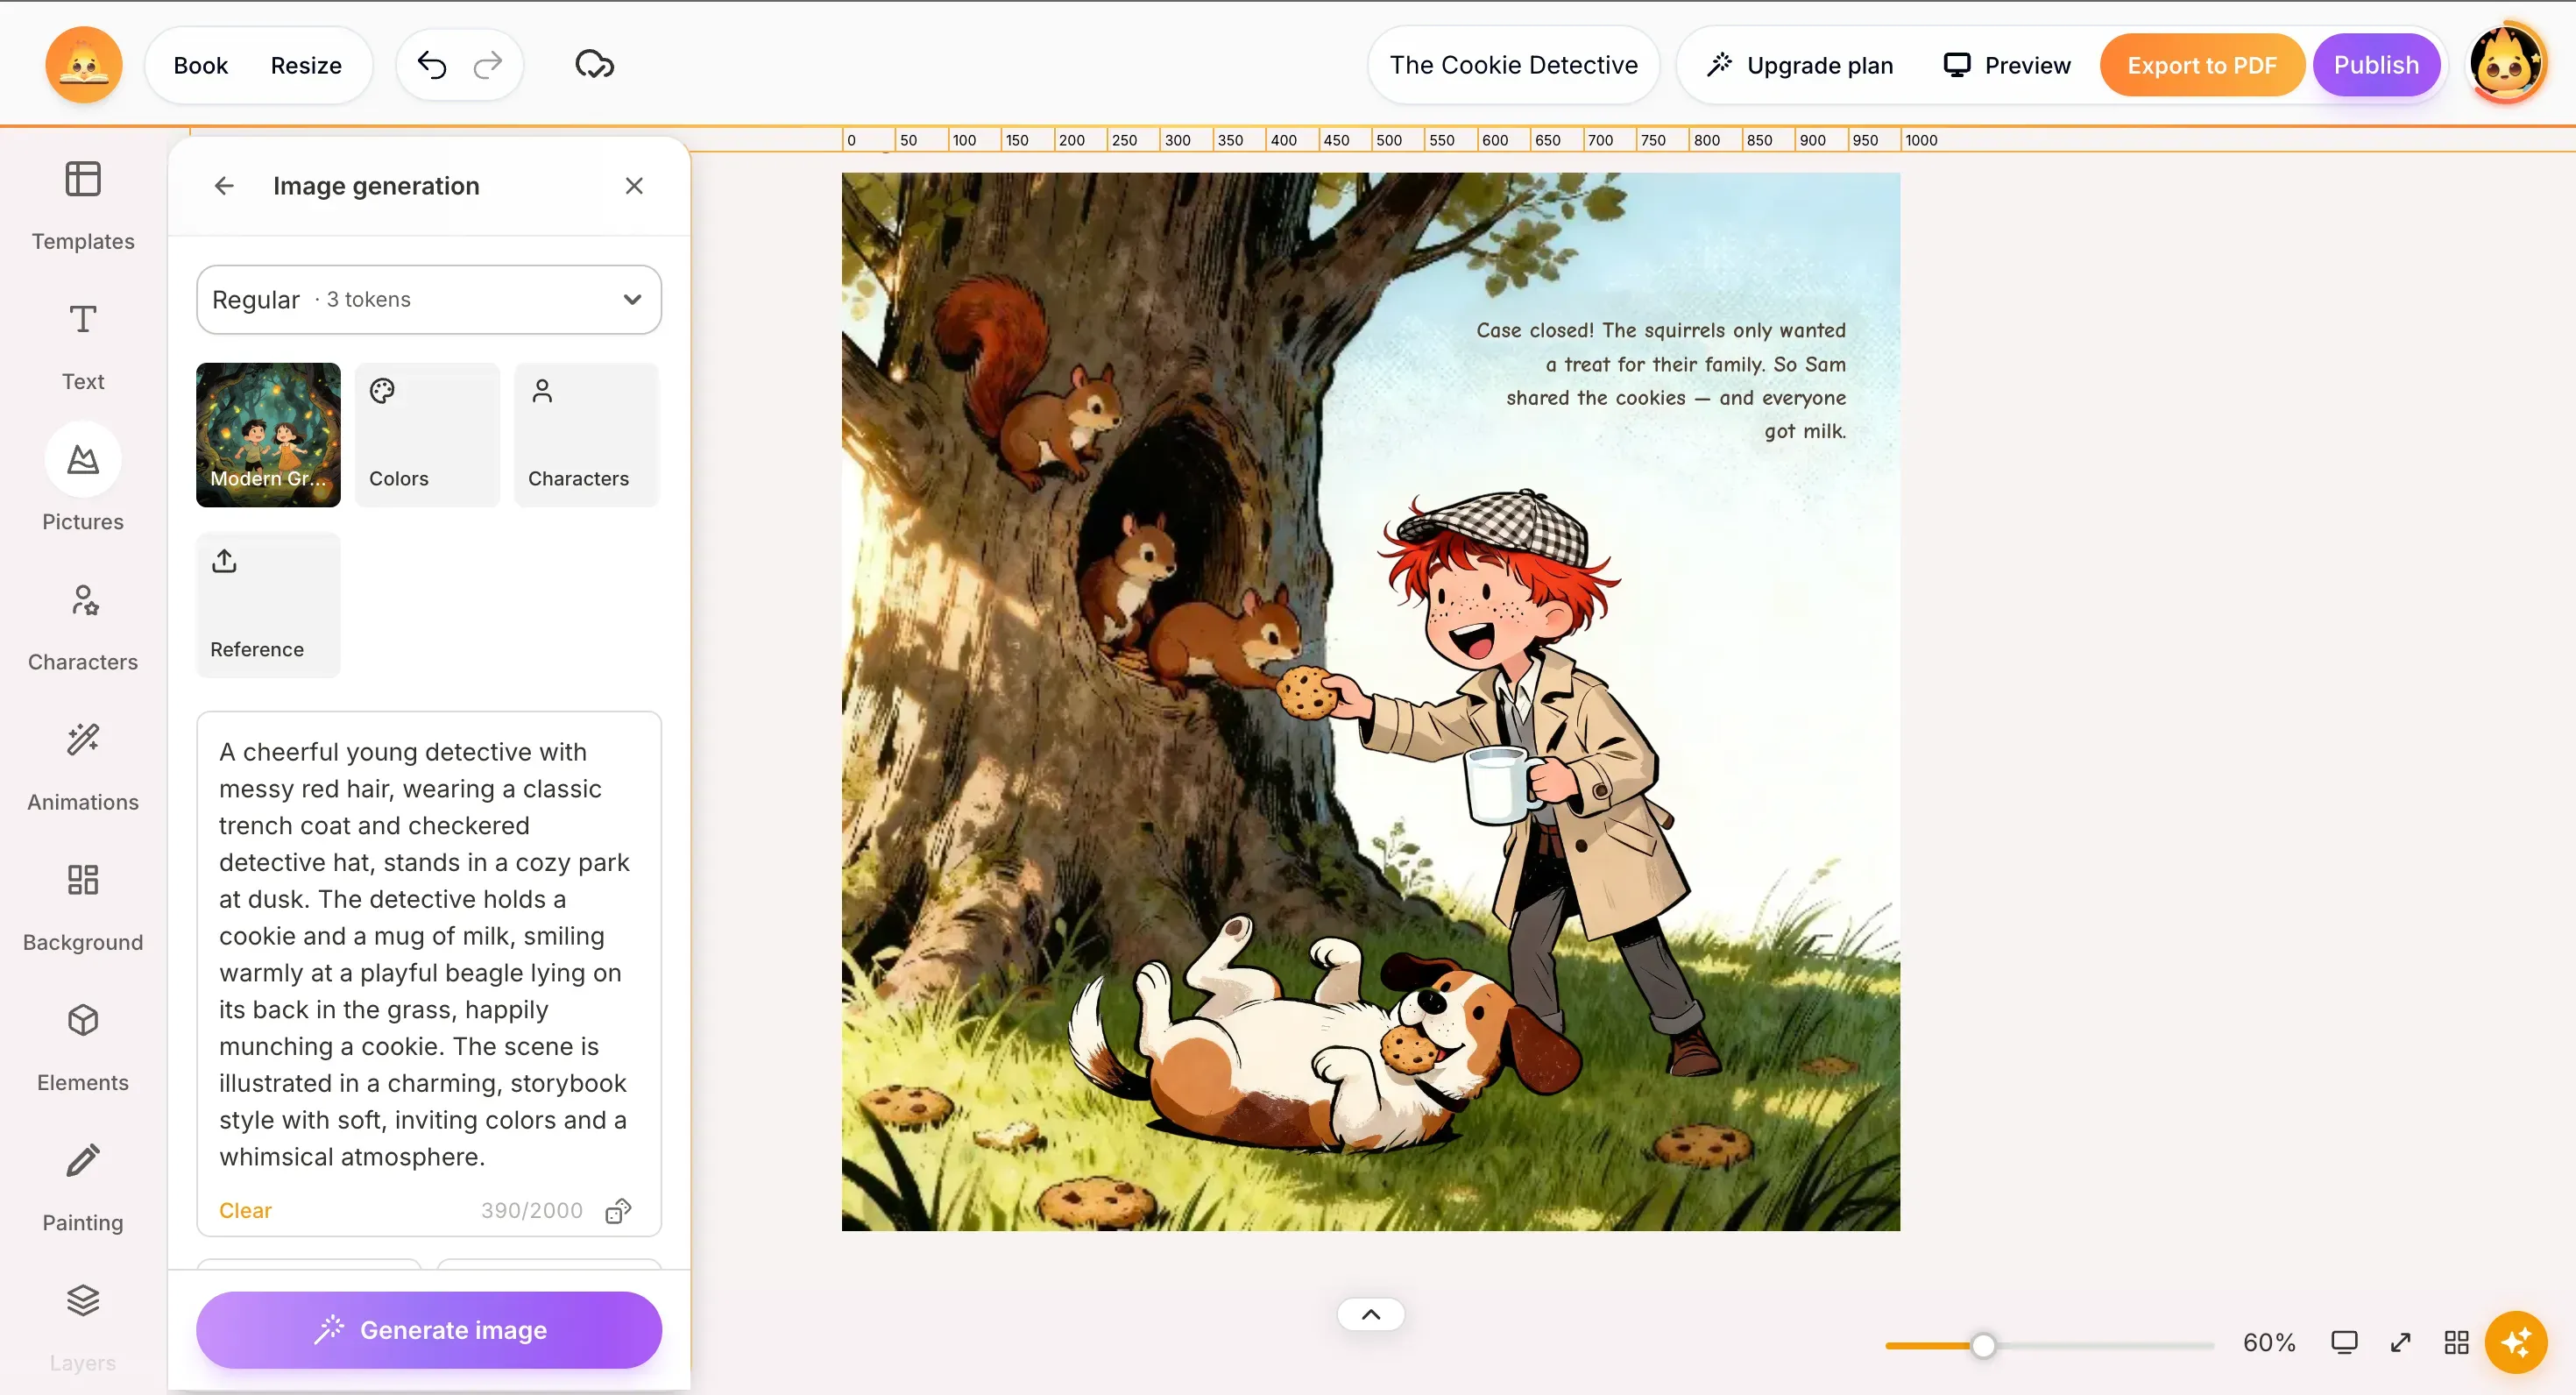
Select an image on the page and click Magic AI in the toolbar that appears at the top. The Image generation panel opens on the left:
| Control | What it does |
|---|---|
| Model | Picks the generation model and shows its price in tokens, so you see the cost before you spend it. Pro models render more detail and are available on Creator and Master Pro. |
| Style | The art style of the image. It starts on your book's style — see below for changing it deliberately. |
| Colors | Steers the palette of the result. |
| Characters | Brings your saved characters into the scene, so they stay recognisable instead of being re-invented. |
| Reference | Upload an image to base the result on. Far more precise than describing it in words. |
| Description | What you want to see, up to 2,000 characters. Clear empties the field. |
| Number of results | How many variants to generate at once with the − and + buttons. More variants, more tokens. |
| Aspect ratio | The proportions of the generated image, for example 16:9. |
Then press Generate image.
Regenerating a picture in a different style
This is the one people hunt for. Open Magic AI on an existing image, change the Style tile to a different one, and generate — the new version comes back in that style.
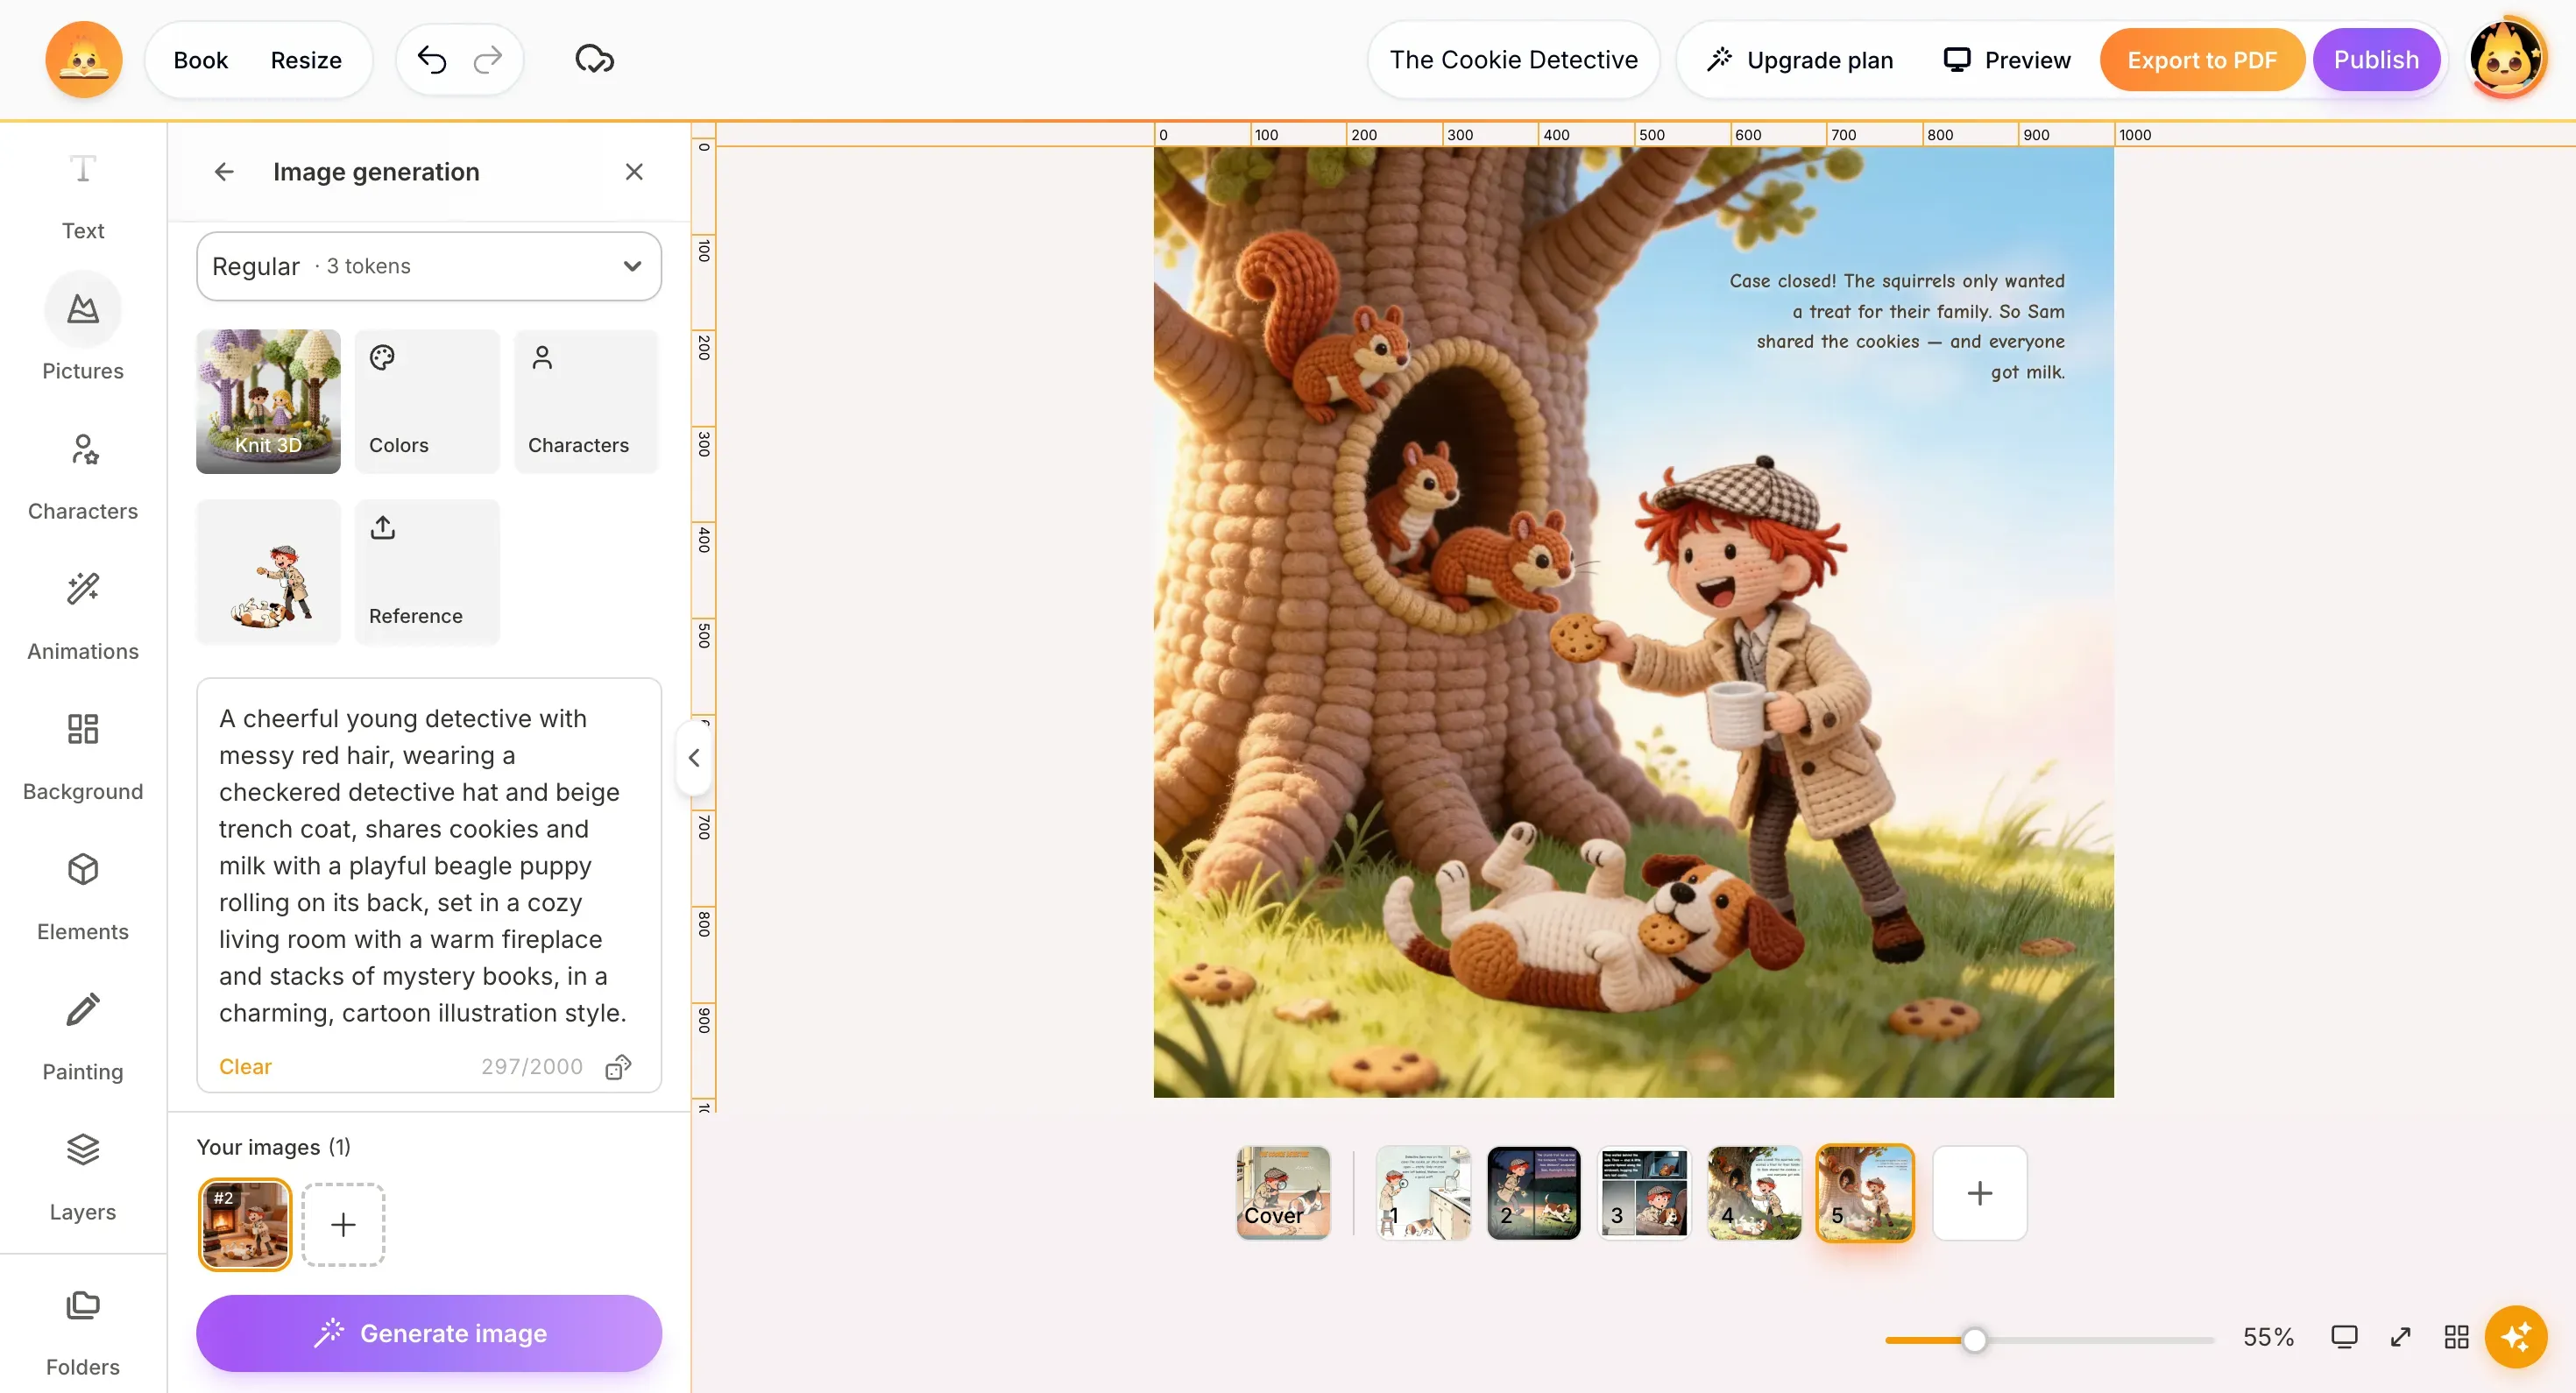
It is also the only way to restyle artwork you have already made, since there is no single action that re-renders a whole book. Use it for a page or two; for a whole book it becomes one regeneration per illustration.
The editing toolbar
Select any image and a toolbar appears above the page. Left to right:
| Button | What it does |
|---|---|
| Edit | Opens Customize: masks, roundness, white balance, light and colour adjustments. |
| Magic AI | Regenerates the image, in the same style or another one. |
| Magic Characters | Regenerates a character in a new pose while keeping their face and outfit. |
| Remove Background | Cuts the subject out of its background in one click. |
| Layering | Moves the image forward or back relative to everything else on the page. |
| Eraser | Rubs out parts of the image by hand, for when the automatic cut-out leaves something behind. |
| Flip | Mirrors the image — useful when your character faces away from the text. |
| Crop | Trims the image down to the part you want. |
| Position | Aligns the image on the page. |
| Copy Style | Copies the adjustments from one image so you can apply the same look to another. |
| Opacity | Fades the image from 0 to 100, handy for softening a background behind text. |
A second small toolbar sits just under the selected image with duplicate, lock and delete.
Magic AI, Magic Characters and Remove Background are part of the Creator and Master Pro plans.
Changing the shape of an image
Open Edit and look at Masks at the top of the Customize panel. A mask crops the picture into a shape — a circle, a rounded rectangle and so on — rather than trimming its content. Press Show all to see the full set.
Roundness below it softens the corners by degrees, which is often all a square illustration needs to stop looking pasted onto the page.
To change the proportions of a new image instead, set the Aspect ratio in Magic AI before generating.
Cropping and cutting out
Three different jobs that are easy to confuse:
- Crop trims the edges of the picture. Use it when the composition is right but there is too much of it.
- Remove Background separates the subject from everything behind it in one click. This is what you want before placing a character or object onto a scene.
- Eraser rubs out parts by hand. It is the clean-up tool for when automatic removal leaves a halo or misses a corner.
Light and colour
The Edit → Customize panel carries the adjustments you would expect from a photo editor, and they apply to generated illustrations just as well:
| Group | Sliders |
|---|---|
| White Balance | Temperature — warms the picture towards amber or cools it towards blue. |
| Light | Brightness, Contrast, Shadows, White, Black. |
| Color | Vibrance and Saturation. |
These are the quickest fix for the most common problem in an AI-made book: pages that are individually fine but do not look like they belong together. Nudging Temperature and Brightness towards a common setting pulls a mismatched set of illustrations into one book. Reset Settings at the bottom undoes everything in the panel at once.
Adjusting light and colour costs nothing and happens instantly. Regenerating costs tokens and gives you a different picture. If an illustration is nearly right, reach for the sliders before you reach for Magic AI.
Drawing on the page
The Painting tool in the left toolbar lets you draw freehand directly on the page. It is the practical answer to small things the generator will not do on request — an arrow, a scribbled heart, a line connecting two things, a quick fix over an awkward detail.
Tip: Build a look once and reuse it. When you have an illustration adjusted the way you like, Copy Style carries those settings to the next one, which is far faster than matching sliders by eye on every page.
Share this article
Need help? Have a question? Chat with our team — we're happy to help.